How To Fix E-Bike Battery Cradle Lock Cylinder Freezing?
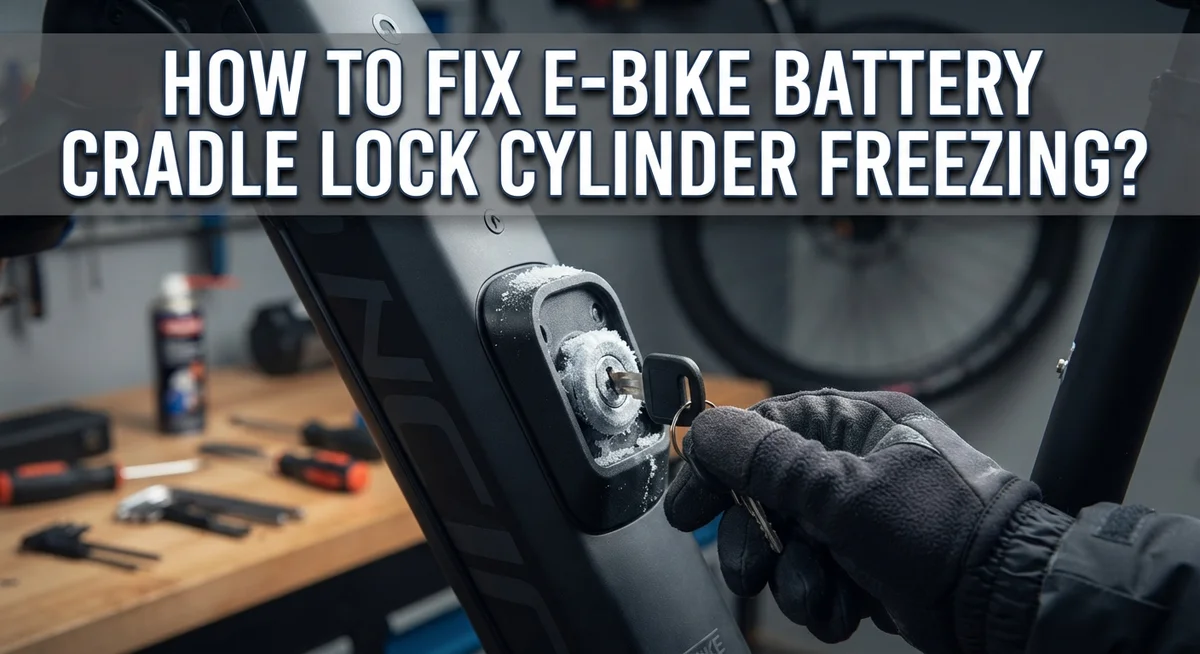
Winter mornings can turn your e-bike commute into a frustrating puzzle. You reach for your battery, but the cradle lock cylinder refuses to budge. Rainwater seeped in, froze overnight, and now your key won’t turn.
This problem happens more often than riders expect. Water gets into the lock mechanism through small gaps. Once temperatures drop, that water turns to ice and jams the internal parts.
The good news is that you have options. You can thaw the lock, replace the cylinder, or take emergency action if you need your battery right away.
In a Nutshell
- Prevention first: Position your lock cylinder facing downward. This stops water from pooling inside and freezing.
- Check the mounting bolts: Most repairs start by locating and removing the bolts that hold the lock cylinder to the frame.
- Swap the whole assembly: You usually need to replace the entire lock cylinder or slide plate. Partial fixes rarely work.
- Order parts early: Manufacturer replacement parts often take time to arrive. Plan ahead if you rely on your e-bike daily.
- Emergency option: If you are locked out completely, drilling into the cylinder with a 5 to 8mm bit can destroy the mechanism and free your battery.
- Avoid common slip ups: Keep track of small bolts during removal. Do not force the lock without the right tools.
Why E-Bike Lock Cylinders Freeze in the First Place
Water gets inside your lock cylinder through tiny gaps and cracks. Rain, snow, and moisture from humid air all find their way in. Once water enters, it sits in the mechanism and waits for cold temperatures.
When temperatures drop below freezing, that trapped water turns to ice. Ice expands as it forms, which creates pressure inside the cylinder. This pressure locks up the internal pins and springs. Your key can no longer turn, and your battery stays stuck on the frame.
The problem gets worse in winter climates with frequent freeze and thaw cycles. Each time the temperature rises, ice melts slightly. Each time it drops again, new ice forms. This repeated freezing weakens the internal components and causes more damage.
Salt and dirt make freezing worse. Winter roads get treated with salt to prevent ice buildup. This salt mixes with water and lowers the freezing point. The salty water freezes at lower temperatures and stays frozen longer.
Your lock cylinder design matters too. Many e-bike locks point upward or sideways. This orientation lets water pool directly inside the mechanism. Gravity works against you when the cylinder opening faces up or to the side.
Cheap lock materials also fail faster in cold weather. Lower quality metals become brittle when frozen. The internal springs lose their flexibility. Pins stick in place instead of moving smoothly.
The longer water sits inside your lock, the more corrosion happens. Rust forms on metal parts. Corrosion creates rough spots that jam the mechanism even after ice melts. This is why prevention matters so much more than repair.
Signs Your Battery Cradle Lock Is Frozen or Damaged
Your e-bike battery cradle lock shows several warning signs when it starts to freeze or sustain damage. Learning to spot these signs early helps you act before you get completely stuck.
The most obvious sign is resistance when you turn your key. Your key may feel stiff or refuse to turn at all. You might hear a grinding sound as you try to unlock the cylinder. This grinding means ice crystals are blocking the internal mechanism.
Another clear indicator is water pooling around the lock area. After rain or snow melt, look for moisture near the cylinder opening. This water will freeze overnight in cold temperatures and expand inside the lock.
Check if your battery won’t slide into the cradle smoothly. A frozen lock cylinder often prevents the battery from seating properly. The battery may feel stuck or sit at an angle instead of clicking into place securely.
Visual damage to the lock body is also important to notice. Look for rust spots, white mineral deposits, or visible corrosion around the cylinder. These signs mean water has already entered and started breaking down the metal parts.
Listen for clicking or rattling sounds when you try to unlock. This suggests internal components have shifted or broken. The lock may feel loose on the frame even when bolts appear tight.
Finally, if your key breaks while turning, that’s a serious warning sign. A broken key means the cylinder was already severely frozen or damaged. Stop using that key immediately to avoid leaving pieces stuck inside.
Pay attention to these signs during winter months. Early detection lets you order replacement parts before your lock fails completely.
Tools You’ll Need Before Starting Repairs
Before you start fixing a frozen e-bike battery cradle lock, gather the right tools. Having everything ready prevents frustration and damage during repairs.
You’ll need a socket set with various sizes. Most e-bike locks use standard bolts that require 8mm, 10mm, or 12mm sockets. A ratchet wrench helps you remove these bolts quickly without stripping them.
Keep a flashlight or headlamp nearby. You need good visibility to see the mounting bolts clearly, especially if your bike sits in a garage or shaded area.
Grab a small container or bag for storing bolts. Losing even one bolt makes reassembly difficult. Label the container so you remember which bolts came from where.
A drill with a 5 to 8mm bit is essential for emergency situations. If your lock cylinder is completely frozen and non functional, drilling destroys the mechanism and lets you remove your battery.
Have penetrating oil on hand. This lubricant helps loosen stuck bolts and can sometimes free up slightly frozen locks before you need to replace parts.
Get a screwdriver set with both flat and Phillips head options. Some lock assemblies use screws alongside bolts, and you’ll need proper tools to avoid damaging them.
A replacement lock cylinder assembly is your main component. Order this from your e-bike manufacturer before starting work, since lead times often run several weeks.
Wear work gloves to protect your hands from sharp edges and cold metal. Winter repairs mean your fingers get cold quickly.
Finally, keep a clean cloth nearby. Wiping away dirt and moisture helps you see exactly what you’re working with and prevents further corrosion during the repair process.
Step-by-Step: Removing the Frozen Lock Cylinder
Start by locating the mounting bolts that hold your lock cylinder to the frame. These bolts usually sit on the sides or back of the cradle assembly. Use your socket set to find the correct size that fits snugly without forcing.
Before you remove anything, take a photo of how the lock sits in place. This helps you remember the correct position when you install the replacement. Mark the bolt locations with a marker or tape if needed.
Carefully loosen each mounting bolt in a cross pattern, just like removing car wheel bolts. This prevents the lock cylinder from tilting or binding. Turn slowly and steadily without rushing the process.
Once all bolts are loose enough, remove them completely and place them immediately into your small container. Losing even one bolt makes reassembly difficult. Set the container somewhere safe where bolts won’t roll away.
Now gently pull the lock cylinder away from the frame. You may need to wiggle it slightly side to side. Don’t force it if resistance occurs, as frozen components need extra patience.
Inspect the mounting area for any remaining ice, dirt, or corrosion. Wipe this clean with a dry cloth before installing your replacement assembly.
The lock cylinder and slide plate assembly come as one unit from your manufacturer. Position the new assembly exactly where the old one sat. Align the mounting holes carefully before inserting bolts.
Tighten bolts gradually in a cross pattern, working from one side to the opposite side. This ensures even pressure and proper alignment. Finish tightening firmly but avoid over tightening, which can crack plastic components.
Test your new lock by inserting the key and turning it smoothly. Your battery should now slide in and out without resistance.
Emergency Fix: Drilling Out a Non-Functional Lock
When your lock cylinder won’t function despite removal attempts, drilling becomes your last resort. This emergency fix destroys the lock mechanism so you can access your battery.
Start by securing your e-bike in a stable position. You need both hands free and the bike completely still. Use a bike stand or ask someone to hold it steady.
Select a drill bit between 5 and 8 millimeters in diameter. Larger bits work faster but may damage the frame around the lock. Smaller bits take longer but give you more control.
Mark the center of the lock cylinder with a marker or tape. This guides your drill straight into the mechanism. Accuracy matters here because you’re destroying the internal parts intentionally.
Put on safety glasses before drilling. Metal shavings will fly out during this process. Wear work gloves to protect your hands from sharp edges.
Position your drill perpendicular to the lock face. Start at low speed to create a pilot hole. Gradually increase speed as you push through the cylinder.
Drill straight through the center until you feel the bit break through the back side. The lock mechanism should separate internally at this point. Stop drilling once you’ve gone completely through.
Remove your drill carefully. Use a small flathead screwdriver to pry or wiggle the lock cylinder. It should now come free from the mounting area.
Your battery cradle is now accessible. You can slide the battery out without the lock blocking it. Order a replacement lock cylinder from your manufacturer immediately so you can secure future batteries.
This emergency fix works only once. Plan to install the new lock assembly as soon as it arrives to restore security.
Installing a Replacement Lock Cylinder or Slide Plate
Once you have removed the frozen lock cylinder, installing a replacement is straightforward. Start by cleaning the mounting area thoroughly. Wipe away any ice, dirt, or corrosion from the frame where the lock attaches. This ensures a tight fit for your new assembly.
Order your replacement lock cylinder and slide plate from your e-bike manufacturer before you begin. Lead times can be long, so plan ahead. Contact their parts department directly to confirm compatibility with your specific model.
Position the new lock cylinder assembly into the mounting area. Align it carefully so the keyway faces the correct direction. Check your photo from the removal step to match the original orientation.
Insert the mounting bolts back through the frame and into the lock assembly. Start with hand tightening all bolts first. This prevents cross threading and allows you to adjust alignment if needed.
Once all bolts are hand tight, use your socket set to tighten them in a cross pattern. This distributes pressure evenly across the assembly. Tighten gradually rather than fully tightening one bolt at a time.
Test your new lock by inserting your battery cradle. It should slide in smoothly without binding or resistance. If it feels stuck, loosen the bolts slightly and adjust the cylinder position.
After successful testing, tighten all bolts to their final specification. Consult your manufacturer’s manual for the exact torque setting if available.
Apply a small amount of waterproof grease around the cylinder opening. This helps repel water and prevents future freezing issues. Wipe away excess grease with a clean cloth.
Your replacement is now complete. Test the lock and battery removal one final time before your next ride.
Preventing Future Freezing and Water Damage
Water is your lock cylinder’s biggest enemy. Once moisture gets inside, cold temperatures turn it into ice that expands and jams the mechanism. The good news? You can stop this from happening with simple steps.
Position your lock downward whenever possible. This angle prevents rainwater from pooling inside the cylinder. Water naturally drains away instead of collecting where it can freeze. Check your e-bike’s design to see if you can adjust the lock orientation during installation.
Keep your lock cylinder covered during storage. If you park outside for extended periods, use a protective cover over the battery area. This shields the lock from direct rain and snow. Even light moisture accumulation matters when temperatures drop below freezing.
Inspect your lock regularly during wet seasons. Look for water droplets around the cylinder edges. Wipe away any visible moisture with a dry cloth after rain or snow. This quick check takes two minutes but prevents major problems.
Apply a protective coating to your lock assembly. Waterproof sealants create a barrier that repels moisture. Reapply these coatings annually or after heavy rain seasons. Follow the product instructions for proper application.
Store your e-bike in a dry location when possible. Garages, sheds, or covered areas keep your battery cradle safe from freeze thaw cycles. If outdoor storage is necessary, use weatherproof covers designed for e-bikes.
Consider upgrading to a solid frame lock design if your current system experiences repeated freezing. These locks have different internal mechanisms that handle moisture better than exposed cylinders.
Check your lock’s drainage holes if it has them. Clear any debris blocking water escape routes. Dust and dirt can trap moisture inside the cylinder.
These prevention steps work together to keep your lock functional year round.
Common Mistakes to Avoid During Repair
When repairing a frozen e-bike battery cradle lock cylinder, several mistakes can make your situation worse. Avoid forcing the lock open with excessive pressure. This damages the internal mechanism and makes replacement more expensive.
Don’t lose your mounting bolts during removal. These small metal pieces are easy to misplace and hard to replace. Keep them in a small container as you work. Label the container so you know exactly where each bolt came from.
Never attempt to lubricate a frozen lock with oil or grease. Water is already inside the cylinder, and adding lubricant creates a thick paste that worsens the problem. This approach delays your repair and causes additional corrosion.
Skip using a hammer or mallet to remove the lock assembly. Striking the lock damages your e-bike frame and the lock components. Use proper tools instead. A socket wrench or adjustable wrench works best for bolt removal.
Don’t drill through the lock without proper safety gear. Wear safety glasses to protect your eyes from metal shavings. A spinning drill bit can throw debris in any direction.
Avoid ordering replacement parts without checking your specific e-bike model first. Different manufacturers use different lock cylinders. Ordering the wrong part wastes time and money.
Never skip the drainage step when installing a new lock. Position the replacement lock downward so water runs away from the cylinder opening. This simple action prevents future freezing.
Don’t ignore small water spots on your lock during regular maintenance. Catching moisture early stops freezing before it starts. Check your lock weekly during wet seasons and address any moisture immediately.
Final Thoughts
A frozen lock cylinder feels frustrating. But you now have clear steps to fix it.
Water causes most freezing problems. It seeps into the cylinder and freezes in cold weather. This locks the mechanism and blocks battery access.
Emergency drilling gets your battery out fast. This method works when you need immediate access. But it destroys the lock permanently.
Replacing the entire assembly is the lasting fix. Order parts directly from your manufacturer for the correct fit. Expect some wait time for delivery.
Installation takes patience and the right tools. Keep track of every bolt during the process. Test the new lock before final tightening.
Prevention matters more than repair. Position your lock downward to stop water pooling inside. This simple change reduces future freezing risks significantly.
Regular checks catch problems early. Look for water spots or rust during wet months. Small issues become big problems if ignored.
A solid frame lock offers better protection long term. These designs resist water intrusion better than standard cylinders. Consider this upgrade if freezing keeps happening.
Your e-bike depends on a working lock system. Battery security and access both matter for daily riding. Don’t let a frozen cylinder stop your rides.
Take action based on your situation. Emergency drilling works for urgent needs. Full replacement solves the problem correctly.
Combine repair with prevention for the best results. Fix the immediate issue first. Then protect your lock from future water damage.
Cold weather and moisture will always threaten lock cylinders. But now you know how to handle both. Your e-bike stays secure and functional through every season.
Frequently Asked Questions
Why does my e-bike battery lock cylinder freeze?
Rainwater enters the lock cylinder and freezes when temperatures drop. The lock’s internal mechanism expands as ice forms, making it impossible to turn or remove your battery. This happens most often in winter or after heavy rain when moisture sits inside the cylinder for hours.
Can I use heat to thaw a frozen lock?
Yes, gentle heat can help. Use a heat gun or hairdryer on low setting and point it at the lock cylinder for 5 to 10 minutes. Let it cool slowly before attempting to remove your battery. Avoid pouring boiling water directly on the lock, as sudden temperature changes can crack metal components.
What should I do if the lock won’t budge after thawing?
Stop forcing it immediately. Apply a small amount of silicone spray around the cylinder edges and wait 15 minutes. Try gently wiggling the key back and forth without twisting hard. If it still won’t move, you may need to replace the entire lock assembly rather than risk breaking your frame or battery connector.
When should I drill out the lock cylinder?
Drilling is your last resort when the lock is completely stuck and you need your battery removed urgently. Use a 5 to 8mm drill bit and aim straight into the center of the cylinder. This destroys the internal mechanism, so order a replacement assembly from your manufacturer afterward. Wear safety glasses and work slowly to avoid damaging the frame around the lock.
How long does it take to replace a lock cylinder?
Removal takes 10 to 15 minutes if you have the right tools. Installation of the new assembly takes another 15 to 20 minutes. Ordering replacement parts may take 2 to 4 weeks depending on your e-bike model and manufacturer stock levels.

Hi, I’m Rosie Tate — a tech enthusiast, gadget geek, and the creator of RapidConvertLab! 🚀 I’ve spent years exploring the ever-evolving world of electronics, smart devices, and Amazon’s hidden tech treasures. Through my honest, hands-on reviews, I help everyday shoppers cut through the noise and pick gadgets that truly deliver value. When I’m not testing a new device, I’m probably unboxing one! 📦✨