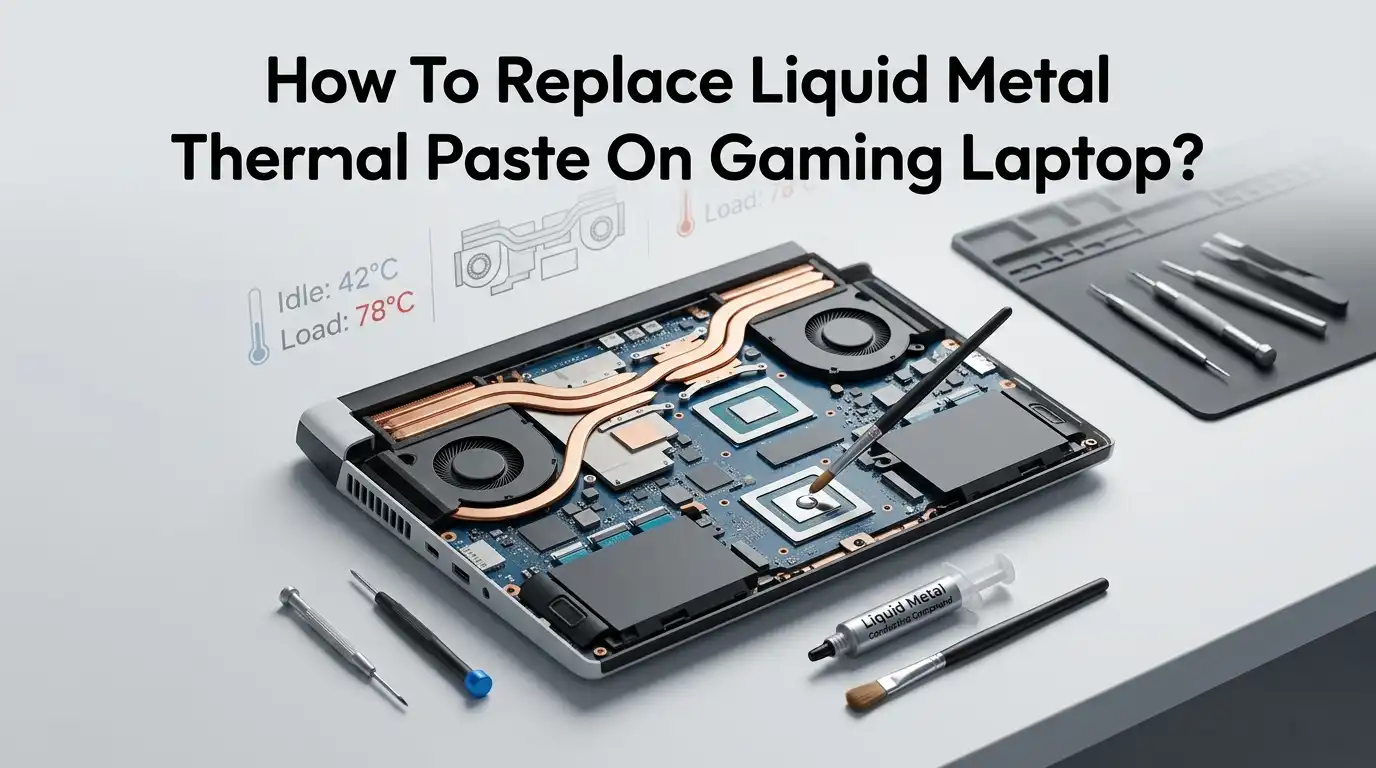
How To Replace Liquid Metal Thermal Paste On Gaming Laptop?
Gaming laptops run hot. Really hot. If your machine ships with liquid metal from the factory, like many ASUS ROG, MSI, or Lenovo Legion models, you already know it offers stunning thermal performance.
But over time, that shiny silver compound dries out, pumps out, or migrates across the die. Temperatures climb. Frame rates drop. Your fans scream like a jet engine.
This guide walks you through every step in plain language. You will learn how to remove old liquid metal, prepare the surfaces, apply a fresh layer, and test the results.
Key Takeaways
- Liquid metal is electrically conductive. A single stray drop can fry your CPU, GPU, or nearby surface mounted components. Always mask the area around the die with electrical tape or apply a conformal coating before you start.
- Repasting frequency matters. Most factory liquid metal applications last between 2 and 4 years before pump out occurs. If your laptop is older than this and runs hot, a refresh will likely solve thermal issues.
- You need specific tools. Cotton swabs, 90 percent or higher isopropyl alcohol, microfiber cloth, a precision screwdriver kit, plastic spudgers, and a fresh tube of liquid metal like Thermal Grizzly Conductonaut are essential. Do not use paper towels or tissues.
- Surface compatibility is critical. Liquid metal reacts with aluminum heatsinks. Most modern gaming laptops use nickel plated copper heatsinks, which are safe. Always confirm your heatsink material first.
- Backup your data and discharge static. Always back up files before disassembly. Wear an antistatic wrist strap or touch a grounded metal object to prevent ESD damage.
- Test before reassembly. Run a stress test for at least 15 minutes after the first boot to confirm temperatures sit within safe ranges before closing the chassis fully.
Why Liquid Metal Needs Replacement Over Time
Liquid metal does not last forever, even though many people assume it will. The compound is mostly gallium based, and it slowly reacts with the surfaces it touches.
Over months and years, it absorbs into the nickel plating or thickens into a paste like consistency. This effect is called pump out, and it reduces thermal conductivity dramatically.
You will notice the symptoms before you see the cause. Your CPU package temperatures may hit 95 degrees Celsius during light gaming. Fans run at full speed during basic web browsing. Performance throttles during long sessions. These are clear warning signs that the original liquid metal has degraded.
Heat cycles also play a role. Every time your laptop heats up and cools down, the liquid metal expands and contracts. Eventually, it migrates away from the hottest part of the die. Replacing it restores even coverage and brings temperatures back down to where they belong.
Tools And Materials You Will Need
Gathering the right supplies before you start saves you from frantic searches mid repair. Working with liquid metal demands precision, and improvising with the wrong tools leads to disaster. Here is what belongs on your workbench before you open the chassis.
You need a precision screwdriver set with Phillips and Torx bits, plastic spudgers or guitar picks for prying, a fresh tube of liquid metal, and a small applicator brush or syringe.
Buy 90 percent or higher isopropyl alcohol, a stack of clean cotton swabs, lint free microfiber cloths, and a roll of Kapton or electrical tape. An antistatic wrist strap protects sensitive components from electrostatic discharge.
Optional but useful items include conformal coating spray, magnification glasses, a small flashlight, and a plastic tray to organize tiny screws by location. Label each screw group with masking tape so reassembly stays smooth and frustration free.
Preparing Your Workspace And Backing Up Data
A clean, well lit workspace prevents costly mistakes. Choose a flat surface like a wooden desk or kitchen table. Avoid carpeted areas because they generate static electricity that can damage your laptop internals. Wipe the surface clean and remove any drinks or food.
Before you touch a single screw, back up every important file to an external drive or cloud storage. Repasting rarely causes data loss, but accidents happen. A dropped screwdriver can puncture your SSD, or static damage can brick the entire system.
Power down the laptop completely, unplug the charger, and remove any USB devices. Let the machine cool for at least 30 minutes so internal components are safe to touch. Place your phone or tablet nearby with the official disassembly guide for your specific model open.
YouTube teardown videos for your exact laptop model are gold during this phase. Watching one before you start helps you anticipate clip locations and cable routing.
Disassembling Your Gaming Laptop Safely
Flip the laptop upside down on a soft cloth to protect the lid. Remove every visible screw from the bottom panel. Some models hide screws under rubber feet or warranty stickers. Removing a warranty sticker may void your coverage, so check your manufacturer policy first.
Use a plastic spudger or guitar pick to release the clips around the edges. Work slowly and listen for the soft pop of each clip releasing. Never force the panel open, because broken clips lead to a rattling chassis after reassembly.
Once the bottom panel comes off, locate the battery and disconnect it first. This step prevents accidental short circuits while you work near the motherboard.
Next, unplug the fan connectors and any antenna or display cables that block heatsink access. Take photos with your phone at every stage so you have a visual reference when putting everything back together.
Removing The Heatsink Without Damaging Components
The heatsink sits on top of the CPU and GPU, secured by spring loaded screws. These screws have numbers stamped next to them showing the correct loosening order. Always follow the numbered sequence in reverse, usually from highest to lowest. Skipping the order can crack the die under uneven pressure.
Loosen each screw a quarter turn at a time, rotating through all of them, until they fully release. Do not lift the heatsink yet. Old liquid metal often acts like glue and bonds the heatsink to the chips. Gently rock the heatsink side to side while applying upward pressure to break the seal.
If it refuses to budge, warm the laptop briefly by running a benchmark before shutdown. The slight heat softens the bond. Once free, set the heatsink aside on a clean cloth, copper side facing up, so the old liquid metal does not contact other surfaces.
Cleaning Old Liquid Metal From The CPU And GPU
This step requires patience. Dried liquid metal looks like dull silver paint on the die and heatsink. Soak a cotton swab in 90 percent isopropyl alcohol and gently rub the surface in small circles. Fresh swabs are essential because metallic residue spreads easily.
Most of the compound lifts off within a few minutes. Stubborn patches may need repeated passes. Never use abrasive materials like sandpaper or steel wool on the die surface, since these scratch the silicon and reduce thermal contact permanently.
For the heatsink, the same alcohol method works. Some users add a tiny drop of fresh liquid metal to dissolve the dried residue, then wipe everything clean.
Avoid the pros and cons of this trick: it works fast but uses extra material and risks contamination. A simpler approach is to keep wiping until the surface looks like polished mirror copper or nickel. Inspect under bright light to confirm zero residue remains.
Masking The Area To Prevent Short Circuits
This is the single most important safety step. Liquid metal conducts electricity, and any drop that touches a capacitor or resistor near the die will short the board. Cut small strips of Kapton tape or electrical tape and carefully frame the silicon die on all four sides.
The tape should sit flush against the die edge without overlapping the surface where you will apply the metal. This barrier catches any accidental drips or smears during application. Some enthusiasts spray the surrounding PCB with conformal coating, which adds an extra insulating layer that lasts for years.
The pros of taping include simplicity and easy removal during future repastes. The cons are that tape can lift over time from heat exposure. Conformal coating offers stronger long term protection but requires careful masking of the die itself before spraying. Choose the method that matches your comfort level and the time you want to invest.
Applying Liquid Metal Correctly
Less is more with liquid metal. Squeeze a tiny bead about the size of a BB pellet onto the center of the die. Use the included applicator brush or a clean cotton swab to spread it in thin, even circular motions. The goal is a wet, uniform sheen that covers the entire die surface without pooling at the edges.
If the metal beads up like water on a waxed car, the surface needs more cleaning or the application needs more pressure. A properly applied layer looks like polished chrome and reflects light evenly across the entire chip.
Repeat the process on the heatsink contact pads directly above the CPU and GPU. Coating both surfaces creates a stronger thermal bond than coating just one side. Inspect carefully for any stray droplets outside the die area and remove them immediately with a clean swab dipped in alcohol.
Reassembling The Heatsink With Even Pressure
Lower the heatsink straight down onto the chips without sliding it sideways. Sliding pushes liquid metal out of position and creates dry spots. Align the screw holes first, then let the heatsink settle into place under its own weight.
Tighten the spring screws in the reverse order you removed them, following the numbered sequence. Turn each screw a quarter turn at a time, rotating through all of them, until they reach full tension. This even pressure technique prevents die cracking and ensures uniform contact across both chips.
Once the heatsink is secure, reconnect the fan cables, antenna leads, and any other cables you unplugged earlier. Plug the battery connector back in last. Double check that no cables are pinched under the heatsink or chassis edges before closing the bottom panel.
Testing Temperatures After Repasting
Power on the laptop and watch for the BIOS screen. If the system boots normally, log in and install monitoring software like HWiNFO64 or HWMonitor. Idle temperatures should sit between 40 and 50 degrees Celsius for most gaming laptops with fresh liquid metal.
Run a stress test using Cinebench R23 for the CPU and FurMark or 3DMark for the GPU. Watch the temperature graphs closely during the first 15 minutes.
Peak temperatures under full load should stay below 90 degrees Celsius on most modern chips. If you see numbers above 95 degrees, shut down immediately and reinspect your application.
Compare the new temperatures with your old readings if you logged them. A successful repaste typically drops load temperatures by 8 to 17 degrees Celsius. The pros of liquid metal include dramatic cooling and quieter fans. The cons include the conductivity risk and the need for periodic reapplication.
Alternatives To Liquid Metal For Beginners
Liquid metal is not the only path to better cooling. PTM7950 phase change thermal pads have become a popular alternative among gaming laptop owners. These pads start solid at room temperature and melt into a thin liquid layer once the chip heats above 45 degrees Celsius.
The pros of PTM7950 are huge. It is non conductive, non toxic, and lasts up to 10 years without pump out. Application requires no masking, no spreading, and almost no skill. You simply cut the pad to die size, place it down, and bolt the heatsink back on.
The cons include slightly worse peak performance compared to top tier liquid metal, with temperatures typically 2 to 4 degrees Celsius higher under load.
For most users, this trade off is worth the safety and longevity gains. Premium traditional pastes like Noctua NT H2 or Arctic MX 6 also offer excellent results with zero electrical risk, making them perfect for first time repasters.
Common Mistakes To Avoid During The Process
Rushing is the number one mistake. A repaste job should take at least 90 minutes from start to finish. Skipping steps like masking, full cleaning, or proper screw sequencing leads to thermal problems or hardware death.
Another common error is using too much liquid metal. Beginners often think more compound means better cooling. The opposite is true. Excess metal squeezes out under heatsink pressure and contacts nearby components, causing immediate shorts when power flows.
Forgetting to reconnect the battery, fan, or display cables before reassembly forces a complete teardown again. Take a final inventory of every cable and screw before you close the chassis.
Lastly, never use thermal paste and liquid metal in the same application. Mixing the two creates a chemical reaction that destroys both compounds and damages the chip surface over time.
Frequently Asked Questions
How often should I replace liquid metal on my gaming laptop?
Most liquid metal applications last between 2 and 4 years before performance drops. If you notice rising temperatures, fan noise, or thermal throttling during games you used to play smoothly, it is time for a refresh.
Can I use regular thermal paste instead of liquid metal?
Yes, premium pastes like Noctua NT H2, Arctic MX 6, or Thermal Grizzly Kryonaut work great. Expect temperatures roughly 5 to 10 degrees Celsius higher than liquid metal, but the safety and ease of application are worth it for most users.
Will replacing liquid metal void my laptop warranty?
Often yes. Many manufacturers consider opening the chassis a warranty violation, especially if you remove warranty stickers. Check your specific brand policy before starting, and consider waiting until the warranty period ends.
Is liquid metal safe on aluminum heatsinks?
No. Liquid metal contains gallium, which corrodes aluminum on contact. Only use it on nickel plated copper heatsinks, which are standard in modern gaming laptops. Always confirm your heatsink material before application.
What happens if liquid metal touches other components?
It causes immediate short circuits that can destroy your CPU, GPU, or motherboard. This is why masking with Kapton tape and applying conformal coating before repasting is so important for protecting nearby surface mounted parts.

Hi, I’m Rosie Tate — a tech enthusiast, gadget geek, and the creator of RapidConvertLab! 🚀 I’ve spent years exploring the ever-evolving world of electronics, smart devices, and Amazon’s hidden tech treasures. Through my honest, hands-on reviews, I help everyday shoppers cut through the noise and pick gadgets that truly deliver value. When I’m not testing a new device, I’m probably unboxing one! 📦✨