How To Fix Smart Luggage Telescopic Handle Binding?
Does your smart luggage handle suddenly stop moving? Do you push the button, but nothing happens?
This is a common problem called handle binding. It happens when something inside the case blocks the smooth motion of the poles.
The good news is that you can often fix this yourself. You do not need to buy a new suitcase.
Binding usually comes from a few simple causes. Dirt can build up inside the tracks. Rigid items packed too tightly can create internal pressure. Sometimes, a small toggle button gets stuck.
In a Nutshell
- Find the cause first. Binding often comes from dirt, misalignment, or internal pressure inside the case.
- Check for pressure points. Open your suitcase and remove rigid items that push against the handle channels.
- Test the toggle button. This small part controls the release. A faulty button often causes a stuck pole.
- Use simple tools. A Phillips screwdriver and pliers help you unscrew the top mount for a closer look.
- Try lubrication. A stuck pole often glides again once you apply a light coat of lubricant.
- Know your assembly type. Screwed handles are easy to fix. Riveted handles usually need a full replacement.
- Test before you close up. Always depress the handle fully after adjustments to confirm smooth motion.
Why Telescopic Handles Bind: Common Causes Explained
Binding happens when your telescopic handle gets stuck or moves slowly. Understanding the root cause helps you fix it faster and avoid repeat problems.
Misalignment is the most common culprit. When you pack heavy items near the handle channels, they push against the internal mechanism. This pressure forces the pole out of its track. The handle then rubs against the sides instead of sliding smoothly.
Dirt and debris build up over time. Dust, lint, and small particles enter the handle shaft during normal travel. These materials accumulate inside the channels and create friction. A stuck handle often means something is blocking the path.
Broken internal springs cause real problems. Your handle uses small springs to push the pole up and down. If a spring breaks or loses tension, the mechanism cannot extend fully. You might feel resistance or hear clicking sounds.
Loose screws at the base create wobbling. The top mount holds your handle to the suitcase body. When screws loosen from vibration and movement, the handle shifts sideways. This misalignment makes the pole bind against the casing.
Internal pressure builds from overpacking. Rigid items like laptops or shoes pressed against the handle area create constant force. This pressure keeps the mechanism compressed and stuck.
The toggle button may malfunction. This button controls the release mechanism. If it stops working, the pole cannot lock or unlock properly. You might see the button is stuck or unresponsive.
Water damage affects metal parts. Moisture corrodes springs and screws inside the handle. Rust creates friction and prevents smooth movement.
The good news is most binding issues are fixable. Start by checking what is causing the problem. Is something pressing on the handle? Is the toggle button working? Does the base feel loose? Once you identify the cause, the fix becomes straightforward.
Tools You’ll Need Before You Start
Before you start fixing your handle, gather the right tools. Having everything ready saves time and prevents frustration.
A Phillips screwdriver is your main tool. You need this to unscrew the top mount that holds your handle to the suitcase. Make sure the tip fits snugly into the screws so you don’t strip them.
Pliers come in handy for gripping and turning small components. They help you remove stuck screws or adjust internal parts that need repositioning. Keep a regular pair and needle nose pliers if possible.
Lubrication is essential for stuck handles. You can use silicone spray or light machine oil to reduce friction. Apply it carefully to avoid damaging your suitcase fabric or electronics.
An epoxy adhesive works for structural damage. If you find broken plastic or cracks inside the handle assembly, epoxy can restore strength. Use it only after you’ve identified the exact damage point.
A flashlight or headlamp helps you see inside the handle channels. The internal spaces are often dark, and good lighting prevents you from missing important details like broken springs or misaligned parts.
A soft cloth is useful for cleaning debris. Wipe away dirt and dust before you apply any lubrication or make adjustments. This simple step often solves binding problems on its own.
Measuring tape helps you check alignment before reassembly. Take quick measurements of how the handle sits at different extension points. This ensures you catch misalignment issues early.
Keep a small container nearby for screws and small parts. Losing a screw means your repair isn’t complete. A container prevents parts from rolling away during your work.
Wear work gloves to protect your hands from sharp edges. Handle assemblies sometimes have rough spots or burrs that can cut skin. Gloves also improve your grip on small components.
Start with these basics. Most handle binding problems respond well to simple tools and careful attention.
How to Diagnose the Source of the Binding
Your first step is to figure out what causes the binding. This makes fixing much easier. Start by opening your suitcase completely and removing any items packed near the handle channels.
Check for pressure points inside your luggage. Heavy items like shoes, books, or electronics often push against the handle shaft. This pressure squeezes the pole and makes it stick. Move everything away from the handle area and test if the handle moves freely now. If it does, you found your problem.
Next, look at the toggle button on your handle. This small button controls whether the pole extends or locks in place. Press it several times while pulling the handle up. Listen for clicking sounds. If the button feels mushy or doesn’t click, it may not be engaging properly with the internal mechanism.
Open your liner compartment carefully. You can usually access this by peeling back the fabric inside your suitcase. Look for dirt, dust, or debris around the handle base. Lint and particles accumulate during travel and create friction. Use your flashlight to see into the handle channels clearly.
Check the top mount where your handle connects to the suitcase body. Look for loose screws using your Phillips screwdriver. Try turning them gently. If they move, they need tightening. A loose mount causes the handle to wobble and bind during extension.
Test the handle movement slowly. Push it down gently while listening for grinding sounds. Grinding means dirt is inside. Creaking suggests misalignment. Resistance without sound often means the toggle button isn’t working.
Take photos of the handle assembly before you make changes. This helps you remember how everything fits back together. Note which screws came from where. This diagnostic process usually takes just five minutes but saves you from making mistakes during repair.
Step-by-Step: Fixing a Stuck or Binding Handle
Start by removing your suitcase from any travel bags or storage. Place it on a flat, stable surface where you have good lighting and room to work. This setup lets you access the handle easily without straining.
Open your suitcase completely. Remove all items inside, especially anything near the handle channels. Heavy objects like shoes, books, or electronics press against the handle shaft and create binding. Set these items aside in a separate area so they don’t interfere with your work.
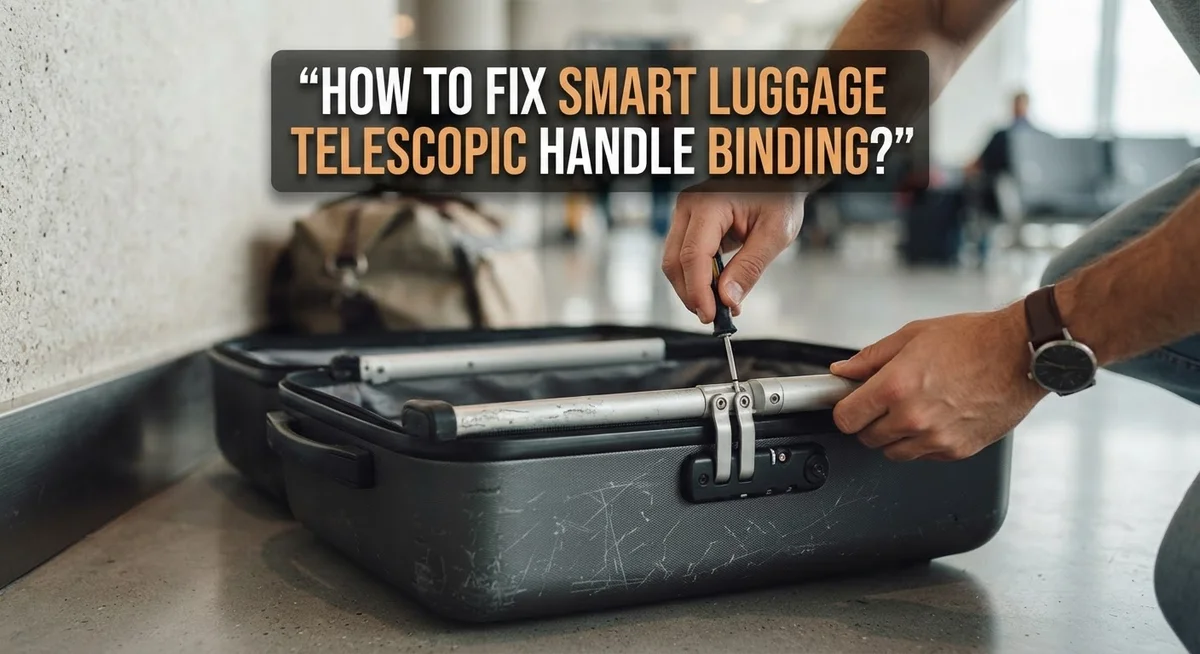
Look at the handle base where it connects to the suitcase body. You’ll see screws holding the top mount in place. Use your Phillips screwdriver to check if these screws are tight. Turn each one clockwise gently. Loose screws often cause the handle to bind because the mount shifts slightly during use.
Next, test the toggle button. This small button on the handle controls extension and locking. Press it down slowly while moving the handle up and down. Listen for any grinding or resistance. If the button feels stuck or doesn’t click smoothly, dirt may have entered the mechanism.
Shine your flashlight into the handle shaft opening. Look for dust, lint, or debris inside the channels. Use a soft cloth to wipe away any visible particles. For stubborn dirt, gently insert the cloth into the shaft and twist it to clean the interior walls.
Push the handle down slowly and feel for resistance points. Does it bind at the top, middle, or bottom of its travel? Note where the problem occurs. This information helps you identify whether the issue is alignment, debris, or a damaged spring.
Test the handle movement several times after each adjustment. Small changes often make a big difference. If binding continues after tightening screws and cleaning, you may need lubrication or internal mechanism inspection in the next steps.
Lubrication and Cleaning Techniques for Smooth Operation
Lubrication and cleaning work together to restore smooth handle operation. When your telescopic handle binds, dirt and debris often accumulate inside the shaft. This buildup creates friction that stops the handle from extending or retracting properly.
Start by cleaning the handle channels thoroughly. Use a soft cloth to wipe away visible dust and dirt from the outside. Then insert the cloth into the handle shaft opening and rotate it gently to capture internal debris. A flashlight helps you see what’s inside before you clean.
For deeper cleaning, access the toggle button area on your handle. This button controls the locking mechanism. Press it repeatedly while moving the handle up and down. This action helps dislodge trapped particles inside the mechanism.
Next, apply lubrication to the handle shaft. Use a light oil or silicone based lubricant that won’t attract dust. Apply a small amount around the handle’s connection points and along the shaft opening. Avoid over lubricating, as excess fluid can collect dirt.
Work the handle up and down slowly after applying lubricant. This distributes the product evenly throughout the mechanism. You should feel the binding resistance decrease as the lubricant reaches tight spots.
If binding persists after cleaning and lubricating, check for internal misalignment. Sometimes the handle pole sits slightly off center inside the shaft. Use your screwdriver to access the top mount carefully. Look for bent components or broken springs that need replacement.
Let any lubricant settle for a few minutes before using your luggage. Test the handle movement multiple times to ensure smooth operation. If the handle still binds after these steps, the internal mechanism may need professional repair or replacement.
Riveted vs. Screwed Handle Assemblies: What It Means for Repair
Smart luggage handles come together in two main ways: riveted or screwed. Understanding which type you have makes a huge difference in how you approach repairs.
Screwed assemblies are your friend. These handles use screws to connect the top mount to your suitcase body. You can access these screws with a Phillips screwdriver. The big advantage? You can remove, adjust, and reinstall components without permanent damage. Most binding issues in screwed handles come from loose fasteners or misaligned parts. A simple tightening often solves the problem in minutes.
Riveted assemblies are permanent. These handles use metal rivets instead of screws. Once a rivet is in place, you cannot remove it without special tools or drilling. This design provides strength but limits your repair options. If the rivet becomes damaged or the handle assembly fails, you typically need to replace the entire handle unit rather than fix individual parts.
The binding problem changes based on your assembly type. With screws, you can access internal mechanisms, clean them, and apply lubrication easily. You can also adjust alignment by loosening screws slightly, repositioning components, and retightening. With rivets, your options narrow significantly. You can still clean external channels and apply surface lubrication, but you cannot access internal parts without destroying the assembly.
Before you start any repair, determine which assembly type you have. Look at the base of your handle where it connects to the suitcase. Do you see screw heads? Then you have a screwed assembly. See smooth metal without visible fasteners? That indicates riveted construction.
Knowing this difference helps you plan realistic repairs. Screwed handles offer flexibility and quick fixes. Riveted handles demand prevention through proper maintenance. Both types benefit from regular cleaning and appropriate lubrication, but your troubleshooting approach should match your assembly type.
Common Mistakes to Avoid When Troubleshooting
Many people make critical errors when trying to fix a binding telescopic handle. These mistakes often make the problem worse instead of better.
The biggest mistake is skipping pressure relief. Your suitcase contains internal pressure from packed items. This pressure pushes against the handle mechanism. People jump straight to loosening screws without removing suitcase contents first. This causes the handle to bind even more during troubleshooting. Always empty your luggage completely before starting any repairs.
Another common error is ignoring the toggle button. This button controls the entire locking and extension system. Many people assume the handle itself is broken when the toggle button is actually stuck or broken. You should test this button multiple times before touching any screws or applying lubricant. A simple toggle button fix takes seconds.
People also rush into lubrication without cleaning first. Dirt and debris accumulate inside the handle channels over time. Adding lubricant on top of this dirt creates a sticky paste that makes binding worse. Clean the channels thoroughly with a dry cloth first. Only then apply lubricant to a clean surface.
Forcing the handle is another critical mistake. If your handle feels stuck, pushing it hard damages internal springs and mechanisms. Work slowly and gently. Listen for grinding sounds. Stop immediately if you feel unusual resistance.
Many people also fail to identify their assembly type before starting repairs. Riveted handles require complete replacement. Screwed handles need simple adjustments. Attempting to repair a riveted handle wastes your time completely.
Finally, people skip measuring components before reassembly. Small springs and screws fall out during troubleshooting. Write down where each piece came from. Take photos of the assembly. This prevents confusion when putting everything back together.
These mistakes transform a quick fix into a broken luggage situation. Slow down and follow the proper sequence every time.
Final Thoughts
Fixing a binding telescopic handle does not need to feel stressful. Most problems come from simple causes like dirt, pressure, or loose screws. You can solve these issues with basic tools and a little patience.
Start with the easiest fixes first. Check the toggle button and relieve pressure before doing anything else. These small steps solve many binding problems right away.
If cleaning and lubrication do not work, look deeper into the mechanism. Misalignment or worn parts often hide behind the surface. A flashlight and screwdriver help you spot these issues quickly.
Remember that your assembly type matters. Screwed handles give you more repair options than riveted ones. Knowing this early saves time and effort.
Take your time during each step. Rushing leads to mistakes like forcing the handle or skipping pressure relief. These errors can turn a small fix into a bigger problem.
Testing your handle after every adjustment keeps you on track. This habit helps you catch issues early and avoid repeating work. Small checks make a big difference in the final result.
Most binding problems get fixed within minutes once you follow the right order. Clean first, lubricate next, then check alignment and screws. This simple process works for most smart luggage handles.
Keep your tools organized and nearby. A screwdriver, cloth, and lubricant handle most repairs without extra effort. Having these ready saves time when problems come up during travel prep.
If your handle still binds after trying these steps, the issue might involve deeper structural damage. In that case, professional repair or replacement becomes the safer option.
With the right approach, most people fix handle binding without stress. Patience and proper technique make all the difference. Your luggage can work smoothly again with just a bit of care and attention.
Frequently Asked Questions
Why does my telescopic handle feel stiff even after cleaning?
Stiffness often means internal springs need lubrication or the toggle button isn’t working correctly. First, press the toggle button several times to reset the mechanism. If that doesn’t help, apply a light lubricant to the internal channels where the handle slides. Let the lubricant settle for a few minutes before testing again.
Sometimes stiffness indicates misalignment inside the handle tube. This happens when packed items create pressure against the handle channels from inside your suitcase. Remove heavy items from near the handle area and try again.
Can I fix a binding handle myself or do I need professional help?
Most binding issues are fixable at home with basic tools. You need a Phillips screwdriver, pliers, and possibly lubricant. Start by relieving internal pressure and checking the toggle button functionality.
If your handle uses screws at the top mount, you can access and adjust the mechanism yourself. Unscrew the top mount carefully and inspect the internal springs and channels. This usually takes just minutes once you gain access.
Professional help becomes necessary only if you have riveted handles or if internal springs are broken. Riveted assemblies require complete replacement since you cannot disassemble them.
What’s the difference between a stuck handle and a binding handle?
A stuck handle won’t move at all. A binding handle moves but feels resistance or friction throughout the motion. Stuck handles usually need lubrication or pressure relief. Binding handles often need cleaning inside the channels where dirt accumulates.
Test your handle carefully to identify which problem you have. This determines your next repair step.
How long does a typical handle repair take?
Most repairs finish within 5 to 15 minutes once you access the mechanism. Simple fixes like cleaning and lubrication take just minutes. More involved work like adjusting screws at the top mount takes slightly longer.
The key is having proper access to the handle assembly before you start working.

Hi, I’m Rosie Tate — a tech enthusiast, gadget geek, and the creator of RapidConvertLab! 🚀 I’ve spent years exploring the ever-evolving world of electronics, smart devices, and Amazon’s hidden tech treasures. Through my honest, hands-on reviews, I help everyday shoppers cut through the noise and pick gadgets that truly deliver value. When I’m not testing a new device, I’m probably unboxing one! 📦✨