Why Is My Smart Weather Station Wind Vane Stuck and How to Clean It?
Your smart weather station once gave you accurate wind direction readings every minute. Now the wind vane sits frozen, pointing stubbornly in one direction while the breeze clearly blows from somewhere else.
Frustrating, right? A stuck wind vane is one of the most common problems homeowners face with outdoor weather sensors. The good news is that you can fix most issues yourself in under an hour.
This guide walks you through every cause, every cleaning method, and every preventive trick to get your wind vane spinning smoothly again.
In a Nutshell
- Spider webs and insect nests are the number one cause of stuck wind vanes, with dirt buildup and corrosion coming close behind. A quick visual inspection often reveals the problem within seconds.
- Warm soapy water and a soft brush can clean most wind vane assemblies safely. Avoid harsh chemicals, WD40, or oil based lubricants because they leave a sticky residue that attracts more dust.
- Bearing wear is the leading mechanical failure on older units. Many weather stations use a small MR104 bearing that you can replace for a few dollars instead of buying a new sensor.
- Annual maintenance keeps your wind vane working for years. A simple seasonal cleaning every spring and fall prevents 90 percent of stuck vane issues before they happen.
- Calibration after cleaning matters just as much as the cleaning itself. A clean vane that points the wrong way still gives you bad data, so always recheck the north alignment.
- Replacement parts cost far less than a full station. If cleaning fails, swapping the bearing, shaft, or full vane cartridge is often the smarter fix.
What a Wind Vane Does on Your Smart Weather Station
A wind vane is the arrow shaped part on top of your weather station that points into the wind. It tells your station which direction the wind is coming from. Inside the housing, a small magnet or potentiometer reads the position of the vane and sends that data to your display or app.
Most consumer weather stations use a sealed bearing system to let the vane spin freely. The vane sits on a thin metal shaft that rotates inside that bearing.
When the bearing gets dirty, wet, or worn, the vane stops turning smoothly. You may see it stuck on one direction or jerking between two readings instead of moving fluidly.
Common Reasons Why Your Wind Vane Gets Stuck
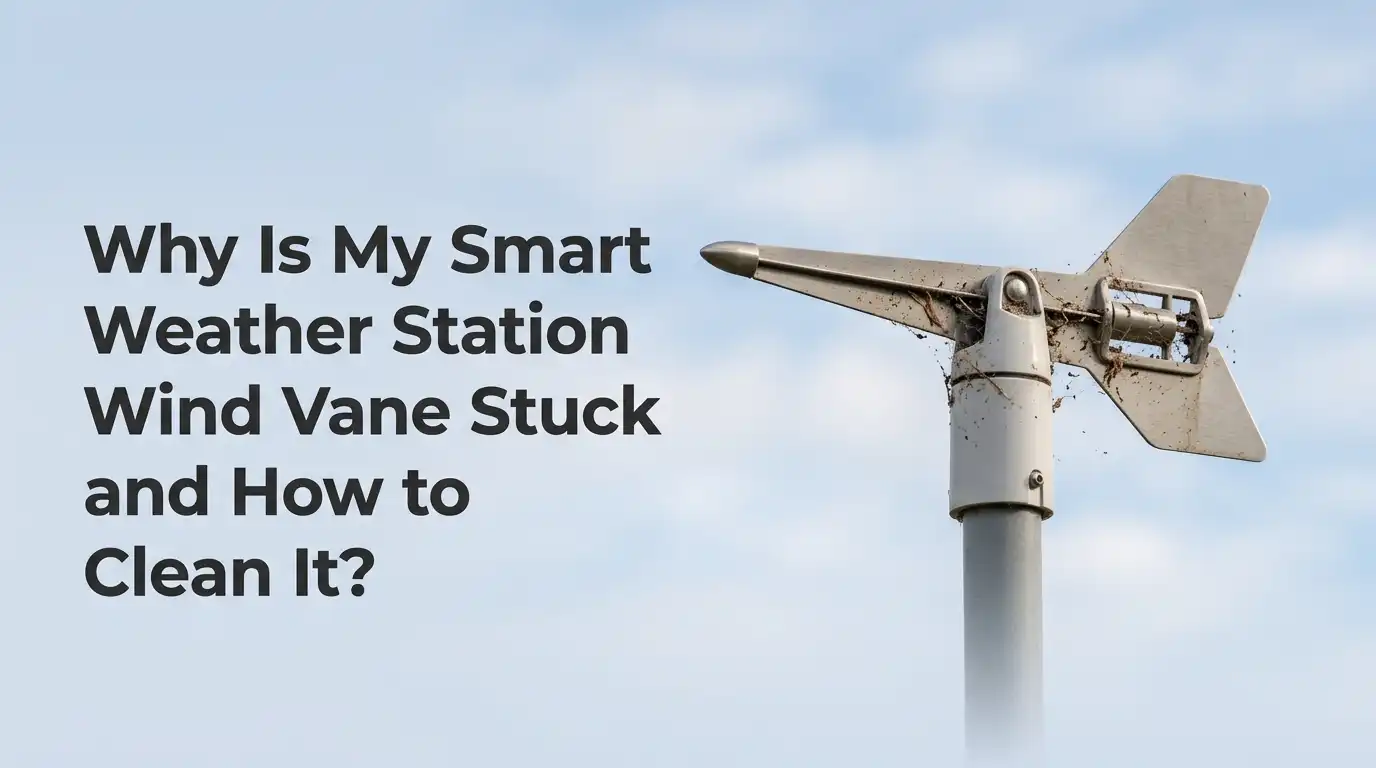
Knowing the cause helps you pick the right fix. Spider webs are by far the most reported issue, with users finding silk strands strong enough to hold the vane in place. Birds, wasps, and small flying insects also build nests inside the housing during warm months.
Dirt and pollen mix with rain to form a paste that hardens around the bearing. Salt corrosion affects coastal users, while ice buildup locks the vane in winter.
A few stations suffer from manufacturing defects in the bearing itself, which causes early failure. Less often, the internal magnet shifts or the wire to the sensor breaks. Each cause needs a slightly different approach, so always start by looking before you start cleaning.
How to Safely Remove Your Wind Vane for Inspection
Safety comes first when working on a roof or pole mounted station. Turn off the station or remove the batteries to avoid any electrical shorts. Use a sturdy ladder with a spotter, and pick a calm dry day for the work.
Most wind vanes lift straight off after you loosen a small set screw on the side. Some models use a snap on cap with no tools needed.
Take a photo of the vane position before removing it so you know how to reattach it correctly. Place all small parts in a container so they do not roll off the roof. Once the vane is in your hand, you can inspect the shaft, bearing, and inner housing under good light.
Pros of removing the vane: You get full access to clean every part properly and you can spot hidden damage easily.
Cons of removing the vane: You risk losing tiny screws and may need to recalibrate the north position afterward.
Cleaning Spider Webs and Insect Nests From the Vane
Spider webs are sneaky. A single silk strand can stop a vane even when you cannot see it from the ground. Start by using a soft paintbrush or makeup brush to sweep around the base of the vane and inside the housing gap.
For tougher webs, dip a cotton swab in warm water and wipe along the shaft. Compressed air in short bursts also clears webs and dust from tight spots without damaging parts.
Look for wasp mud, mud dauber tubes, or small egg sacs tucked into the housing. Remove these with a thin wooden skewer or toothpick. Never use metal tools near the bearing, since one scratch can ruin the smooth rotation forever.
Pros of brush and air cleaning: Quick, gentle, and safe for electronics.
Cons of brush and air cleaning: May not remove sticky residue or hardened grime.
Washing the Wind Vane With Warm Soapy Water
For built up dirt and pollen, a proper wash works better than dry brushing. Mix a few drops of dish soap into a cup of warm water. Dip a soft toothbrush or cotton cloth into the solution and gently scrub the vane, shaft, and housing.
Avoid soaking the unit if it contains electronics. Most sensor housings are weather resistant but not waterproof when opened.
Rinse with clean water using a damp cloth, then dry every surface with a microfiber towel. Let all parts air dry in the sun for at least an hour before reassembly. This step removes the salt, sugar, and organic residue that brushes leave behind.
Pros of soapy water cleaning: Removes sticky grime, safe on plastic, and cheap.
Cons of soapy water cleaning: Water can seep into bearings and cause rust if not dried completely.
Dealing With Bearing Problems Inside the Vane
The bearing is the heart of your wind vane. Once dirt enters this tiny sealed ring, the vane stops spinning freely even after a deep clean. Spin the bare shaft between your fingers. If you feel grit, drag, or hear a scraping sound, the bearing is the problem.
Many popular weather stations use a standard MR104 ball bearing that you can buy from any hobby or skate shop for a dollar or two.
Pop the old bearing out with a small punch or screwdriver, then press the new one in by hand. Do not lubricate the shaft or bearing with oil or WD40. Manufacturers warn against this because oils attract dust and gum up the bearing within weeks.
Pros of bearing replacement: Permanent fix, very cheap, and restores like new performance.
Cons of bearing replacement: Requires basic tools and steady hands, may void warranty on some models.
How to Handle Corrosion on Metal Parts
Coastal homes and humid climates often see white or green corrosion on the shaft and contacts. Salt air eats away at metal over time, and once corrosion takes hold, the vane drags or sticks completely.
A vinegar and water solution at a one to one ratio dissolves most light corrosion. Soak a cotton swab and rub the affected area gently. For stubborn rust spots, use a fine grit sanding sponge or a brass brush. Wipe everything clean with fresh water afterward and dry well.
A thin coat of corrosion inhibitor spray, like a marine grade product, protects metal contacts without leaving an oily film on moving parts. Always keep this spray away from the bearing itself.
Pros of vinegar cleaning: Cheap, food safe, and effective on light rust.
Cons of vinegar cleaning: Can damage some plastics or coatings if left too long.
Fixing Wind Vanes Frozen by Ice or Snow
Winter brings its own wind vane problems. Freezing rain coats the vane and locks it in place. Snow packs into the housing gap and refreezes overnight. You may notice the vane reads one direction for hours after a storm.
Never pour hot water on a cold sensor because the thermal shock can crack the plastic housing. Instead, use a hair dryer on low heat from at least twelve inches away. Let the ice melt slowly while you brush off softened chunks with a soft cloth.
After the vane spins again, apply a thin layer of food grade silicone spray to the outer plastic only, never the bearing. This helps water bead off and reduces refreezing during the next cold snap.
Pros of hair dryer method: Gentle, controllable, and prevents cracking.
Cons of hair dryer method: Slow and needs a power source near the install spot.
Recalibrating the Wind Direction After Cleaning
A clean vane is only half the job. If you removed the vane during cleaning, the sensor may now read the wrong direction. This is called a calibration offset.
Use a compass or your phone compass app to find true north. Point the vane head directly north and tighten the set screw in that position. Open your weather station app and check that the display also reads north.
Most modern smart stations have a calibration option in the settings menu where you can enter a direction offset in degrees. Wait five to ten minutes for the reading to stabilize before testing again with a known wind direction. A second test pointing east confirms the calibration is correct.
When to Replace Parts Instead of Cleaning
Sometimes cleaning just delays the inevitable. If the vane wobbles loosely on its shaft, the inner sleeve is worn. If the reading jumps randomly even in still air, the magnet or sensor chip has failed. These problems need new parts, not more cleaning.
Check the manufacturer website for replacement wind cartridges, shafts, or full vane assemblies. Many brands sell these parts for a fraction of a new station price.
Generic compatible bearings also fit many models if you measure the inner and outer diameter. Before ordering, look up your exact model number, since two stations from the same brand often use different parts. A quick call to customer support saves time and money on the wrong order.
Pros of replacement parts: Restores full function, often comes with warranty.
Cons of replacement parts: Some parts are hard to find for older or discontinued models.
Preventive Maintenance to Stop Future Sticking
Prevention beats repair every time. Set a reminder on your phone to check the wind vane twice a year, once in spring and once in fall. Each check takes about fifteen minutes and saves hours of troubleshooting later.
Trim tree branches that hang over the station to reduce falling debris and spider activity. Install a bird spike near the mount if birds keep landing on the vane. Spray the outside housing with a mild peppermint or citrus solution, since spiders avoid these scents.
A small piece of fine mesh under the vane housing blocks insects from crawling inside without affecting airflow. Keep notes on what you find each season so you can spot patterns over time.
Pros of preventive routine: Catches small problems early, extends sensor life by years.
Cons of preventive routine: Requires regular roof or ladder access, takes consistent effort.
Tools and Supplies You Should Keep Handy
A small dedicated weather station maintenance kit saves trips to the store. Stock a soft bristle brush, cotton swabs, microfiber cloths, a can of compressed air, and a small bottle of dish soap. Add a tube of silicone spray and a few spare MR104 bearings for quick fixes.
Include a Phillips screwdriver, a small flathead, and a set of hex keys for any set screws. A compass and a phone with a weather app help with calibration testing. Store everything in a labeled container near your tool shelf.
Add a printed copy of your station manual to the kit so you do not need to dig through emails when troubleshooting on the roof. This simple prep turns most repairs into a quick afternoon job.
Frequently Asked Questions
How often should I clean my smart weather station wind vane?
Most users get good results from a deep clean every six months. If you live in a dusty, coastal, or heavily wooded area, increase that to every three or four months. A quick visual check once a month helps you catch spider webs and nests before they cause sticking. Look at your wind direction reading during a known windy moment. If it matches the actual wind, your vane is working fine.
Can I use WD40 to free up a stuck wind vane?
No, you should avoid WD40 and similar oil based sprays on weather station bearings. Manufacturers, including Davis and AcuRite, specifically warn against lubricating wind vane shafts. The oil attracts dust, pollen, and dirt within days, which makes the sticking problem much worse over time. If your vane needs lubrication, use a dry graphite powder sparingly, or simply replace the bearing for a permanent fix.
Why does my wind vane spin but show the wrong direction?
This is almost always a calibration issue, not a cleaning issue. The vane head likely shifted on the shaft, or the sensor was installed without proper north alignment. Loosen the set screw, point the arrow to true north using a compass, then retighten. Check your app for a calibration offset setting and adjust until the display matches reality. A magnet near the sensor can also cause false readings, so check for metal objects nearby.
Is it safe to clean my wind vane in the rain?
You can clean it in light rain if the housing stays closed, but heavy rain risks water entering the electronics once you remove the vane. Pick a dry, calm day with mild temperatures for the best results. Wet plastic also becomes slippery on rooftops, which adds a safety risk during the climb. Always prioritize your safety over the urgency of the repair, since one extra day of bad wind data is far better than a fall.
What if my wind vane still does not work after cleaning?
If a thorough cleaning and bearing check do not solve the problem, the issue likely lies in the electronics or the wireless connection. Replace the batteries first, then check the signal strength on your display. Look for damaged wires or cracked solder joints near the sensor. If those check out, contact the manufacturer for warranty support or order a replacement vane cartridge. Most modern stations let you swap the wind sensor without buying a whole new unit.

Hi, I’m Rosie Tate — a tech enthusiast, gadget geek, and the creator of RapidConvertLab! 🚀 I’ve spent years exploring the ever-evolving world of electronics, smart devices, and Amazon’s hidden tech treasures. Through my honest, hands-on reviews, I help everyday shoppers cut through the noise and pick gadgets that truly deliver value. When I’m not testing a new device, I’m probably unboxing one! 📦✨